
Imagine a skillet that delivers the comforting warmth of a classic breakfast, the sweet allure of honey, and the bold bite of garlic—all in one harmonious bite. This Sweet & Savory Honey Garlic Chicken Rice Skillet captures that magic, turning an ordinary morning into a celebration of flavor.
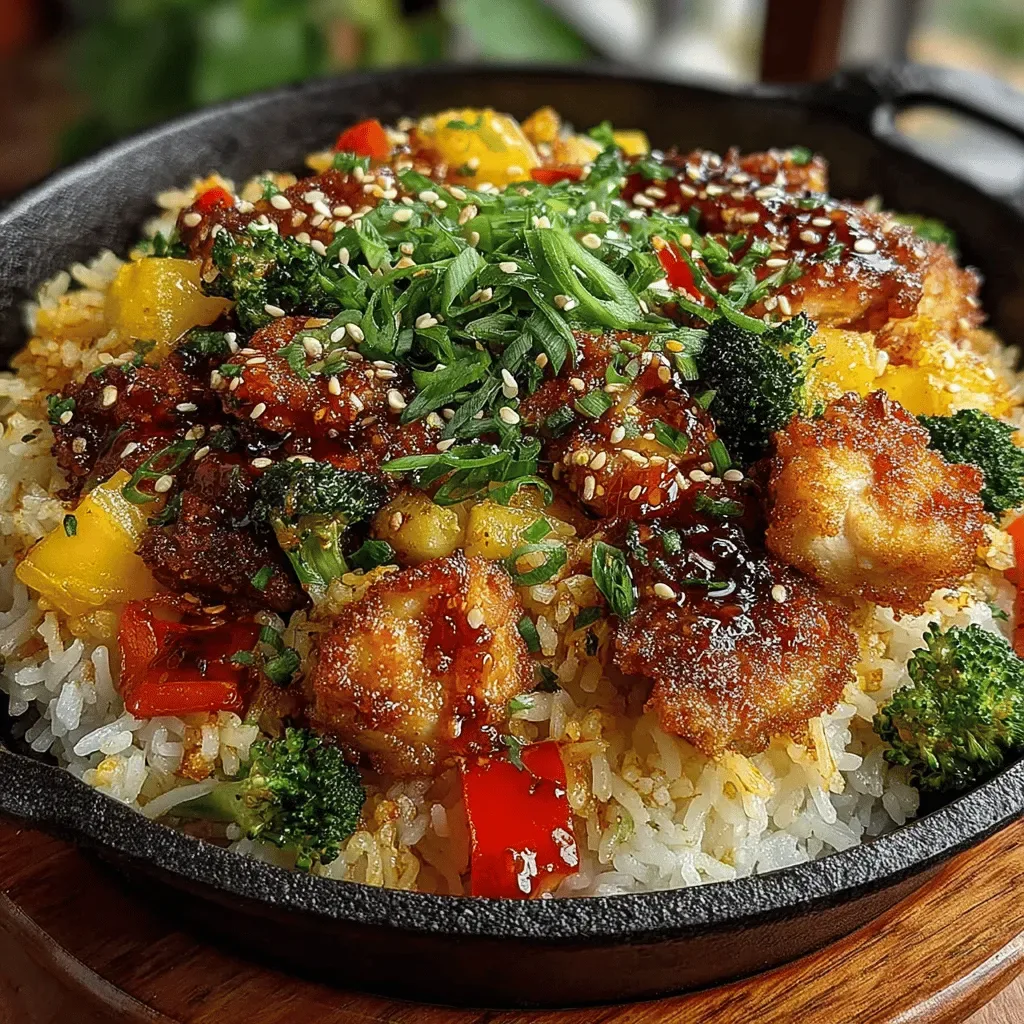
What sets this dish apart is the perfect balance between caramelized honey‑glazed chicken and fluffy, aromatic rice, all brightened by crisp vegetables and a whisper of fresh herbs. The sauce clings to every morsel, creating a glossy finish that looks as good as it tastes.
Whether you’re feeding a sleepy family, impressing brunch guests, or simply craving a hearty start to a lazy weekend, this skillet works beautifully. It’s a crowd‑pleaser for kids who love a touch of sweetness and adults who appreciate the depth of garlic‑infused sauce.
The cooking process is straightforward: sear the chicken, sauté the aromatics, simmer the honey‑garlic glaze, then finish everything together with rice and vegetables in the same pan. Minimal cleanup, maximum flavor.
Why You'll Love This Recipe
One‑Pan Wonder: All components cook together, meaning fewer dishes, less mess, and a cohesive flavor profile that simply can’t be achieved when you keep elements separate.
Sweet‑Savory Harmony: The honey adds a gentle sweetness that perfectly offsets the savory garlic and soy notes, creating a balanced taste that satisfies both sweet‑tooth cravings and umami lovers.
Quick Yet Satisfying: From prep to plate in under 45 minutes, this dish fits busy mornings without sacrificing the comforting feeling of a home‑cooked brunch.
Customizable Canvas: Swap vegetables, proteins, or grains to match dietary needs or seasonal produce, making the recipe endlessly adaptable while retaining its core deliciousness.
Ingredients
For this skillet I rely on fresh, high‑quality ingredients that each play a distinct role. The chicken provides a lean protein base that soaks up the honey‑garlic glaze, while the rice offers a neutral canvas that carries the sauce. Bright vegetables contribute texture and a pop of color, and the herbs finish the dish with a fragrant lift. Every element is chosen to create a balanced bite that is both hearty and light.
Main Ingredients
- 4 boneless, skinless chicken breasts (about 1½ lb)
- 1 cup long‑grain white rice
- 2 cups low‑sodium chicken broth
Rice & Vegetables
- 1 cup frozen peas and carrots (thawed)
- ½ cup diced red bell pepper
- 2 green onions, sliced thin
Sauce Components
- 3 tablespoons honey
- 4 cloves garlic, minced
- 2 tablespoons soy sauce (or tamari for gluten‑free)
- 1 tablespoon rice vinegar
Seasonings & Garnish
- ½ teaspoon crushed red‑pepper flakes (optional)
- Salt and freshly ground black pepper, to taste
- 2 tablespoons fresh cilantro, chopped
These ingredients work together to create a dish that is both comforting and exciting. The honey‑garlic glaze caramelizes on the chicken, while the broth‑infused rice soaks up every nuance of flavor. The vegetables add a sweet crunch, and the final splash of cilantro brightens the whole skillet, ensuring each forkful is layered, juicy, and unforgettable.
Step-by-Step Instructions
Preparing the Chicken & Pan
Start by patting the chicken breasts dry with paper towels—dry surfaces brown better. Slice each breast into bite‑size strips, then season generously with salt, pepper, and the optional red‑pepper flakes. While the chicken rests, heat a large, deep‑skillet over medium‑high heat and add 2 tablespoons olive oil. The oil should shimmer but not smoke before the chicken hits the pan.
Cooking & Building the Sauce
- Sear the chicken. Lay the strips in a single layer, leaving space between pieces. Let them cook undisturbed for 3‑4 minutes until a deep golden crust forms. Flip and sear the opposite side for another 3‑4 minutes. This step locks in juices and creates the caramelized base for the glaze.
- Deglaze with aromatics. Reduce the heat to medium, add the minced garlic, and sauté for about 30 seconds until fragrant. Quickly stir in the honey, soy sauce, and rice vinegar, scraping the browned bits from the pan. Those fond pieces are flavor gold, enriching the sauce.
- Simmer the glaze. Allow the mixture to bubble gently for 2‑3 minutes. It will thicken slightly, coating the back of a spoon. If it becomes too thick, splash in a tablespoon of chicken broth to achieve a silky consistency.
- Introduce rice and broth. Stir in the uncooked rice, ensuring each grain is coated with the glaze. Pour in the remaining chicken broth, bring the mixture to a low boil, then reduce to a gentle simmer. Cover the skillet with a tight‑fitting lid.
- Add vegetables. After the rice has cooked for 10 minutes, scatter the peas, carrots, and red bell pepper over the top. Replace the lid and continue cooking for another 8‑10 minutes, or until the rice is tender and the liquid is fully absorbed.
Finishing & Serving
Turn off the heat and let the skillet rest, covered, for 5 minutes. This resting period lets the rice steam to perfection and the chicken retain its moisture. Sprinkle the sliced green onions and chopped cilantro over the top, give a final drizzle of any remaining glaze, and serve directly from the pan while steaming hot.
Tips & Tricks
Perfecting the Recipe
Pat the chicken dry. Moisture creates steam, which prevents a crisp crust. A quick pat with paper towels makes a big difference in browning.
Use a heavy‑bottom skillet. Cast iron or enameled steel distributes heat evenly, ensuring the sauce reduces uniformly without scorching.
Don’t lift the lid too early. Trapping steam allows the rice to finish cooking without becoming dry.
Flavor Enhancements
A splash of fresh lime juice right before serving adds bright acidity that cuts through the sweetness. For a deeper umami note, stir in a teaspoon of toasted sesame oil after the skillet is removed from heat. Finally, a pinch of toasted sesame seeds adds subtle nuttiness and visual appeal.
Common Mistakes to Avoid
Avoid stirring the rice too vigorously; it can become gummy. Also, resist the urge to add all the broth at once—gradual addition lets the rice absorb liquid evenly, preventing a soggy texture.
Pro Tips
Pre‑marinate the chicken. Even a 30‑minute soak in half the sauce intensifies flavor and yields juicier bites.
Use low‑sodium broth. This gives you control over the final salt level, especially important when soy sauce is already in the mix.
Finish with butter. A tablespoon of cold butter swirled in at the end creates an ultra‑silky sauce that clings to every grain.
Rest before serving. Letting the skillet sit for five minutes equalizes temperature and redistributes juices for a moist final product.
Variations
Ingredient Swaps
Feel free to replace chicken with turkey cutlets, pork tenderloin strips, or firm tofu for a vegetarian twist. Swap peas and carrots for broccoli florets or snap peas, and use brown rice or quinoa if you prefer extra fiber. For a different sweet note, try maple syrup or coconut nectar instead of honey.
Dietary Adjustments
To keep the dish gluten‑free, use tamari in place of soy sauce and verify that your broth is certified gluten‑free. For a dairy‑free version, omit butter and use a splash of coconut milk at the end for creaminess. Keto diners can substitute cauliflower rice for the grain and replace honey with a low‑carb sweetener like erythritol.
Serving Suggestions
Pair the skillet with a simple cucumber‑mint salad for a refreshing contrast, or serve alongside warm naan or crusty sourdough to mop up extra sauce. For a brunch spread, add a side of scrambled eggs or avocado slices to round out the meal.
Storage Info
Leftover Storage
Allow the skillet to cool to room temperature, then transfer the contents to an airtight container. Refrigerate for up to 4 days. For longer keeping, portion into freezer‑safe bags or containers, seal tightly, and freeze for up to 3 months. Label with the date to track freshness.
Reheating Instructions
Reheat in a preheated 350°F (175°C) oven, covered with foil, for 15‑20 minutes until the interior reaches 165°F. This gentle method preserves moisture. In a pinch, microwave individual portions on medium power for 2‑3 minutes, stirring halfway, and add a splash of broth or extra glaze to revive the sauce.
Frequently Asked Questions
This Sweet & Savory Honey Garlic Chicken Rice Skillet delivers a satisfying blend of sweet, salty, and garlicky flavors with minimal fuss. By following the detailed steps, using fresh ingredients, and applying the pro tips, you’ll achieve a restaurant‑quality dish right at home. Feel free to experiment with swaps or add your own twist—cooking is an adventure, after all. Enjoy every bite of this comforting, crowd‑pleasing masterpiece!


