
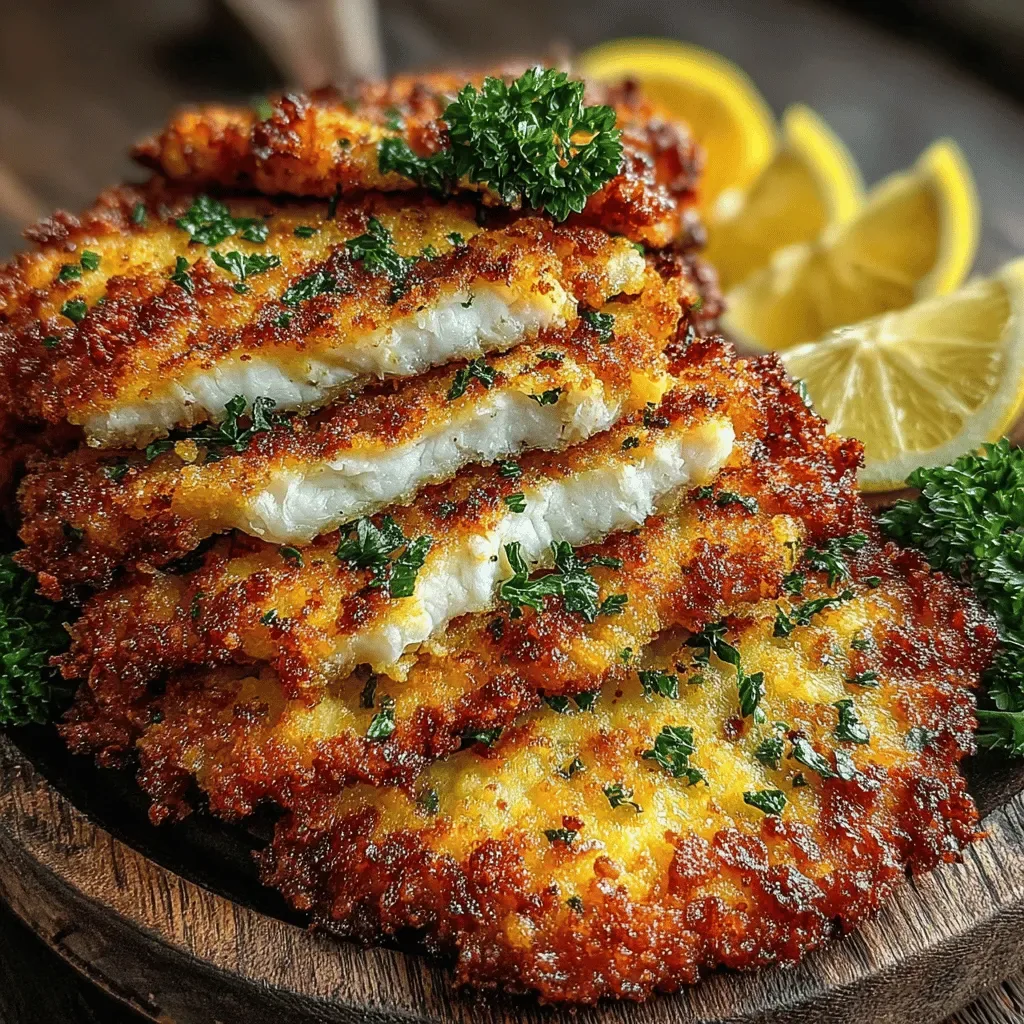
Imagine biting into a piece of chicken that crackles with a perfectly golden crust, while the interior stays juicy, tender, and brimming with subtle herbs. That’s the promise of our Crispy Golden Fried Chicken Cutlets – a breakfast‑and‑brunch star that feels both indulgent and comforting.
What sets this recipe apart is the double‑layered coating: a light flour‑spice mix followed by a panko‑parmesan blend, each seasoned with a secret blend of smoked paprika and garlic powder. The result is a crunch that stays crisp even after a brief finish in the oven.
Family members who love hearty morning meals, brunch‑enthusiasts craving a savory twist, and anyone who appreciates a well‑executed fried dish will adore this. Serve it for a lazy weekend brunch, a special birthday breakfast, or even a casual weekday treat.
The process is straightforward: tenderize and season the chicken, dip it through a three‑step breading station, fry until golden, then finish in a hot oven to lock in moisture. Follow each step and you’ll have restaurant‑quality cutlets without the hassle.
Why You'll Love This Recipe
Irresistible Crunch: The panko‑parmesan coating creates a light, airy crust that stays crunchy even after the final oven bake, delivering texture contrast in every bite.
Juicy Interior: A quick sear locks in the chicken’s natural juices, while a short oven finish ensures the meat reaches perfect doneness without drying out.
Breakfast‑Friendly Flavors: A hint of lemon zest and fresh herbs adds brightness that pairs beautifully with eggs, hash browns, or a simple fruit salad.
Simple Yet Impressive: With just a few pantry staples and a clear step‑by‑step guide, you can serve a dish that looks and tastes like it belongs in a brunch‑café.
Ingredients
For the ultimate crispy cutlet, we start with fresh, skinless chicken breasts that are pounded thin for even cooking. A three‑step breading system—flour, egg wash, and a seasoned panko‑parmesan mix—creates layers of flavor and crunch. The seasoning blend combines smoked paprika, garlic powder, and a touch of lemon zest for brightness. Finally, a quick drizzle of melted butter after frying adds richness and helps the crust stay golden.
Main Ingredients
- 4 boneless, skinless chicken breasts
- 1/2 cup all‑purpose flour
- 2 large eggs
Breading & Seasonings
- 1 cup panko breadcrumbs
- 1/4 cup grated Parmesan cheese
- 1 teaspoon smoked paprika
- 1/2 teaspoon garlic powder
- 1/2 teaspoon onion powder
- 1/2 teaspoon kosher salt
- 1/4 teaspoon freshly ground black pepper
Finishing Touches
- 2 tablespoons unsalted butter, melted
- 1 tablespoon fresh lemon zest
- 2 tablespoons chopped fresh parsley
The flour creates a dry surface for the egg to cling, while the egg wash acts as the glue that holds the seasoned panko‑parmesan mixture in place. Smoked paprika and garlic powder give the crust a depth of flavor that pairs perfectly with the bright lemon zest added at the end. A quick brush of melted butter after frying locks in moisture and adds a glossy finish that makes the cutlets look as good as they taste.
Step-by-Step Instructions
Preparing the Chicken
Place each chicken breast between two sheets of plastic wrap and gently pound with a meat mallet to an even ½‑inch thickness. This uniformity guarantees that the cutlets cook at the same rate, preventing a dry exterior with a raw interior. Sprinkle both sides with kosher salt and black pepper, then let rest for 10 minutes while you set up the breading stations.
Creating the Breading Station
- Flour Mix. In a shallow dish, combine the 1/2 cup all‑purpose flour with half of the smoked paprika, garlic powder, and a pinch of salt. Whisk to distribute evenly; the flour will absorb surface moisture, ensuring the egg adheres properly.
- Egg Wash. In a second shallow bowl, beat the 2 large eggs with a splash of water. The liquid coating adds richness and helps the breadcrumb mixture cling without falling off during frying.
- Panko‑Parmesan Mix. In a third dish, stir together the 1 cup panko breadcrumbs, 1/4 cup grated Parmesan cheese, remaining smoked paprika, onion powder, and a dash of black pepper. This blend provides the signature crunch and a subtle cheesy depth.
Frying the Cutlets
- Heat the Oil. Add ¼‑inch of vegetable oil to a large skillet and heat over medium‑high until it reaches 350°F (a drop of water sizzles instantly). Consistent heat is crucial for an even golden crust.
- Coat the Chicken. Dredge each piece first in the flour, shaking off excess, then dip into the egg wash, and finally press into the panko‑parmesan mixture, ensuring an even coating on both sides.
- Fry Until Golden. Carefully lay the cutlets in the hot oil, working in batches to avoid crowding. Fry for 2‑3 minutes per side, watching for a deep amber hue. Over‑crowding drops the oil temperature, resulting in soggy breading.
- Drain. Transfer fried cutlets to a wire rack set over a baking sheet. This allows excess oil to drip away while keeping the crust crisp.
Finishing in the Oven
Preheat the oven to 375°F. Brush each cutlet lightly with the 2 tablespoons melted butter and sprinkle the 1 tablespoon fresh lemon zest over the top. Place the rack‑lined sheet pan in the oven for 5‑7 minutes, just until the interior reaches 165°F and the coating is set. Remove, garnish with 2 tablespoons chopped fresh parsley, and serve immediately for maximum crunch.
Tips & Tricks
Perfecting the Recipe
Room‑Temperature Chicken: Let the pounded breasts sit out for 10‑15 minutes before breading. This prevents a cold center that could cause uneven cooking.
Oil Temperature Check: Use a thermometer; if the oil is too cool, the coating will absorb excess oil and become soggy, too hot and it will burn before the meat cooks.
Flavor Enhancements
Add a pinch of cayenne to the panko mix for a subtle heat, or stir in finely chopped fresh rosemary for an aromatic twist. A drizzle of honey‑mustard sauce on the side pairs beautifully with the lemon zest and brightens the savory profile.
Common Mistakes to Avoid
Skipping the resting period after frying lets steam soften the crust, turning it limp. Also, never flip the cutlets too early; allow the first side to set fully before turning, otherwise the coating will fall apart.
Pro Tips
Use a Wire Rack: Draining on a rack keeps the bottom from sitting in oil, preserving crunch on all sides.
Season the Flour: Adding a touch of salt and pepper to the flour layer gives an extra flavor boost that penetrates the meat.
Butter Finish: Brushing with melted butter just before the final oven burst adds richness and a glossy sheen that makes the crust look restaurant‑ready.
Rest Before Slicing: Let the cutlets rest 5 minutes after the oven; this redistributes juices and prevents a dry bite.
Variations
Ingredient Swaps
Replace chicken with thinly sliced pork tenderloin or turkey cutlets for a different protein profile. For a vegetarian twist, use firm tofu slices, pressing them first to remove excess water. Swap panko for crushed cornflakes for an extra‑crunchy texture, or use gluten‑free panko if you need a wheat‑free version.
Dietary Adjustments
For gluten‑free diners, substitute the flour with a 1:1 gluten‑free blend and use certified gluten‑free panko. To keep it dairy‑free, omit the Parmesan and butter; replace butter with a drizzle of olive oil and add a splash of dairy‑free “nutritional yeast” for a cheesy note. Keto lovers can swap honey zest for a pinch of erythritol and serve over cauliflower mash.
Serving Suggestions
Pair the cutlets with fluffy buttermilk biscuits, a light arugula salad dressed in lemon vinaigrette, or a classic hash brown stack. For a brunch spread, add poached eggs and a side of fresh fruit. A simple drizzle of hot honey or sriracha mayo adds a sweet‑spicy finish that elevates the dish.
Storage Info
Leftover Storage
Allow the cutlets to cool completely, then place them in an airtight container. Store in the refrigerator for up to 3 days. For longer keeping, wrap each cutlet in plastic wrap, then foil, and freeze in a zip‑top bag for up to 2 months. Proper sealing prevents freezer burn and preserves the crunchy coating.
Reheating Instructions
Reheat in a 350°F oven on a wire rack for 12‑15 minutes, covering loosely with foil to avoid over‑browning. This restores crispness without drying the interior. In a pinch, a skillet over medium heat with a splash of oil for 3‑4 minutes per side works well, but the oven method yields the best texture.
Frequently Asked Questions
This guide walks you through every detail needed to achieve perfectly crispy, golden fried chicken cutlets that shine at any breakfast or brunch table. From selecting the right ingredients to mastering the double‑coat technique, you now have the tools to repeat this dish with confidence. Feel free to experiment with herbs, spices, or side pairings—cooking is a playground. Serve hot, enjoy the crunch, and savor the satisfaction of a truly elevated brunch classic.


