It was a crisp autumn evening, the kind where the kitchen smells like a blend of woodsmoke and fresh herbs, and my teenage daughter begged for something that felt both indulgent and effortless. I rummaged through the pantry, pulled out a pack of thin, peppery salami, and remembered a little trick my grandmother taught me—rolling the slices into tiny, sturdy cups that could hold a creamy surprise. As the salami sizzled lightly in the pan, a faint, salty crackle filled the room, and the aroma instantly reminded me of holiday parties where bite‑size delights vanished in seconds. That moment sparked the idea for what would become a family favorite: Crisp Salami Cup Appetizers that are as satisfying to make as they are to eat.
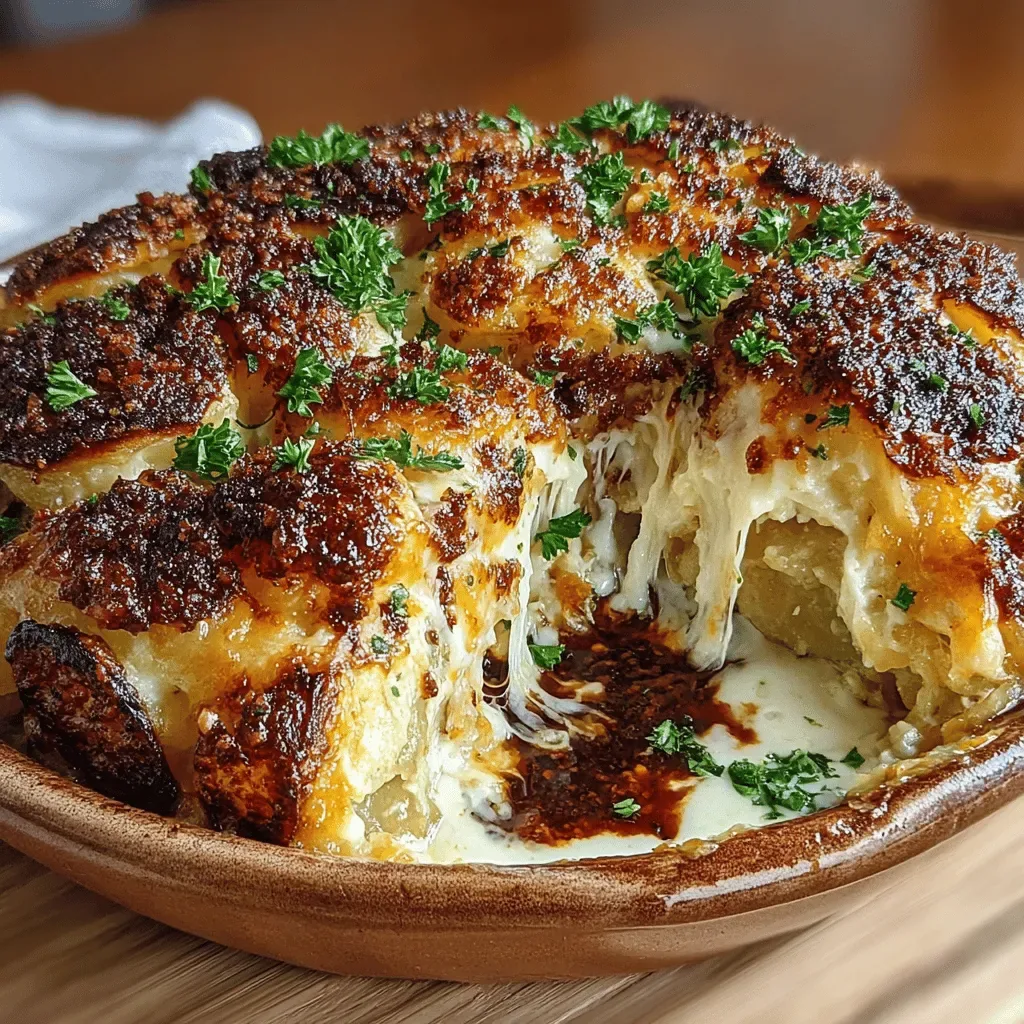
What makes these little cups truly special is the marriage of textures: the crisp, almost chip‑like shell of the salami juxtaposed with a velvety, herb‑infused cream cheese filling that melts just enough to create a luscious bite. Imagine the first bite—your teeth break through the crunchy edge, releasing a burst of savory, buttery cheese punctuated by the sweet pop of roasted red peppers and the fresh lift of parsley. The flavor profile is layered, yet each component shines on its own, creating a harmony that feels both rustic and refined. Have you ever wondered why restaurant appetizers seem to have that perfect balance? The secret lies in the precision of each ingredient and the mindful timing of each step, something we’ll explore together.
But wait—there’s a hidden trick that turns an ordinary snack into a show‑stopping star, and I’ll reveal it in step four of the instructions. Trust me, once you master that little secret, your guests will be asking for the recipe before you even finish serving the last cup. And because I love sharing the little nuggets of wisdom that I’ve gathered over countless family gatherings, I’ll sprinkle in some personal anecdotes, pro tips, and even a few cautionary tales to keep you from common pitfalls. The best part? This recipe is flexible enough to adapt to whatever you have on hand, making it perfect for spontaneous get‑togethers or carefully planned dinner parties.
Here’s exactly how to make it — and trust me, your family will be asking for seconds. Grab a cutting board, a few simple pantry staples, and get ready to transform humble salami slices into elegant, bite‑size works of art. As you follow along, keep an eye out for the bold flavor boosters and the subtle techniques that elevate this dish from simple to spectacular. Let’s dive in and start assembling these irresistible appetizers that will have everyone reaching for more.
🌟 Why This Recipe Works
- Flavor Depth: The combination of aged salami and creamy cheese creates a layered taste that satisfies both salty and mellow cravings, making each bite feel indulgent without being overwhelming.
- Texture Contrast: The crisp, slightly crunchy salami cup provides a perfect vessel for the smooth, melt‑in‑your‑mouth filling, delivering a delightful mouthfeel that keeps diners engaged.
- Ease of Preparation: With only a handful of ingredients and minimal cooking steps, this recipe is approachable for cooks of any skill level, yet it feels special enough for a party spread.
- Time Efficient: From prep to plate, you’re looking at under an hour, which means you can whip up a crowd‑pleasing appetizer even on a busy weeknight.
- Versatility: The base filling can be customized with different herbs, cheeses, or even proteins, allowing you to tailor the flavor to the season or your guests’ preferences.
- Nutrition Balance: While indulgent, the recipe offers a modest protein boost from the salami and cheese, and the parsley adds a burst of fresh vitamins.
- Ingredient Quality: Using high‑quality, thin‑cut salami ensures a sturdy cup that won’t soggy, and fresh parsley brings a bright, herbaceous finish.
- Crowd‑Pleasing Factor: Bite‑size, handheld, and easy to eat, these appetizers are perfect for mingling, making them a hit at any gathering.
🥗 Ingredients Breakdown
The Foundation: Salami Shells
The star of this dish is the thin salami, which serves as both flavor carrier and edible vessel. Using 12 slices of thin salami ensures you have enough material to form sturdy cups without needing to overlap layers, which could make them soggy. Look for salami that has a fine, even texture and a subtle hint of pepper; the natural fat content will render just enough to crisp up without burning. If you can’t find thin‑cut varieties, you can quickly slice a thicker piece with a sharp knife or a mandoline. The secret to a perfect cup is to lay the slice flat, gently fold the edges upward, and secure them with a toothpick while they bake.
Aromatics & Spices: Flavor Builders
The cream cheese provides a creamy, neutral base that lets the other flavors shine, while the grated Parmesan adds a nutty, umami punch that deepens the overall taste. Fresh parsley brings a bright, slightly peppery note that cuts through the richness, and the Italian seasoning blends oregano, basil, and thyme for a classic Mediterranean vibe. A single small clove of garlic, minced finely, injects a subtle sharpness that awakens the palate without overpowering the delicate balance. Salt and black pepper are added at the end to fine‑tune the seasoning, ensuring each bite is perfectly seasoned.
The Secret Weapons: Roasted Red Peppers
Finely diced roasted red peppers lend a sweet, smoky depth that complements the salty salami and creamy cheese. Their vibrant orange‑red hue also adds a visual pop, making each cup look as appealing as it tastes. If you’re looking for a twist, consider swapping them for sun‑dried tomatoes for a more intense, tangy flavor, or even pickled jalapeños if you enjoy a hint of heat. The key is to dice them very small so they blend seamlessly into the filling, distributing flavor evenly throughout each bite.
Finishing Touches: Optional Garnishes
While the recipe stands strong on its own, a light drizzle of extra‑virgin olive oil or a sprinkle of crushed red pepper flakes can add an extra layer of complexity. A few extra parsley leaves on top not only brighten the presentation but also reinforce that fresh herbal aroma that makes the dish feel spring‑like even in winter. If you’re feeling adventurous, a dusting of smoked paprika can introduce a subtle earthiness that pairs beautifully with the salami’s natural smokiness. Remember, the garnish should enhance, not mask, the core flavors.
With your ingredients prepped and ready, let's get cooking. Here’s where the fun really begins, and I’ll walk you through each step with the kind of detail that makes even a novice feel like a seasoned chef.

🍳 Step-by-Step Instructions
Preheat your oven to 375°F (190°C) and line a baking sheet with parchment paper. While the oven warms, lay out the salami slices on a clean cutting board, ensuring they’re flat and not overlapping. Lightly brush each slice with a drizzle of olive oil—this tiny step creates a glossy finish and helps the edges crisp up evenly. Place a small toothpick at the base of each slice to keep the cup shape stable during baking. Trust me on this one: the oil and toothpick combo is what gives you that perfect, golden‑brown cup without any collapse.
Now, gently fold the edges of each salami slice upward, forming a shallow cup about an inch tall. The key is to keep the walls thin; if they’re too thick, they won’t crisp properly, and if too thin, they might tear. Secure the fold with the toothpick you placed earlier, making sure it’s anchored into the base of the cup. Once all cups are formed, arrange them on the prepared baking sheet, spacing them a little apart so the heat can circulate.
💡 Pro Tip: If you prefer a slightly softer cup, lower the oven temperature to 350°F and bake for an extra 5 minutes; the salami will stay pliable yet still hold its shape.While the salami cups are taking shape, prepare the creamy filling. In a medium bowl, combine 1/2 cup softened cream cheese, 1/4 cup grated Parmesan, 1/4 cup finely chopped fresh parsley, 1 teaspoon Italian seasoning, and the minced garlic clove. Use a rubber spatula to blend until the mixture is smooth, with no lumps—this ensures a uniform texture that spreads easily into the cups. Add the finely diced roasted red peppers, then season with salt and black pepper to taste. The aroma of garlic and herbs should start to fill your kitchen, hinting at the deliciousness to come.
Here’s the secret trick: before spooning the filling, lightly toast the interior of each salami cup for 3‑4 minutes. This extra toast step creates a subtle caramelized flavor that deepens the overall taste profile. After the brief toast, remove the sheet from the oven and let the cups cool for a minute—this prevents the filling from melting too quickly when added.
⚠️ Common Mistake: Overfilling the cups can cause the filling to spill over and make the salami soggy; aim for a heaping teaspoon per cup.Spoon a generous teaspoon of the cream cheese mixture into each toasted salami cup, smoothing the top with the back of the spoon. The filling should sit just below the rim, allowing a little space for the cheese to melt and bubble slightly during the final bake. If you’re feeling artistic, you can swirl the filling with a tiny fork to create a decorative pattern that looks professional on the plate.
Return the baking sheet to the oven and bake for 12‑15 minutes, or until the salami edges turn a deep amber and the cheese filling is lightly golden and just beginning to bubble. You’ll know it’s ready when you hear a faint sizzle and see the edges of the cups crisp up, releasing a tantalizing aroma that fills the kitchen. Keep a close eye on the final minutes; you want the cheese to set but not brown too aggressively.
💡 Pro Tip: Rotate the baking sheet halfway through the bake for even browning, especially if your oven has hot spots.Once baked, remove the cups from the oven and let them rest for 2‑3 minutes. This brief cooling period allows the cheese to firm up just enough to hold its shape when you pick them up, preventing any accidental spills. While they’re cooling, you can prepare any optional garnish—perhaps a drizzle of olive oil, a pinch of crushed red pepper, or a fresh parsley leaf on top.
Finally, gently pull out the toothpicks (they should slide out easily) and transfer each cup to a serving platter. Arrange them in a circular pattern or a rustic wooden board, whichever suits your presentation style. The final look is a collection of glossy, golden‑brown cups, each crowned with a creamy, herb‑speckled topping that promises a burst of flavor with every bite.
And there you have it! But before you dig in, let me share some tips that will take this from great to absolutely unforgettable. A quick taste test before serving will let you adjust the final seasoning—perhaps a pinch more salt or a dash of lemon zest for brightness. Serve warm, and watch how the combination of textures and flavors creates an instant crowd‑pleaser. Now, let’s explore those expert tips that will make your next batch even more impressive.
🔐 Expert Tips for Perfect Results
The Taste Test Trick
Before you spoon the filling into the salami cups, take a small spoonful and taste it. This quick check lets you fine‑tune the salt, pepper, or even add a splash of lemon juice for acidity. I once served these to a group of friends who all asked for “just a bit more salt,” and that tiny adjustment made the whole batch sing. Trust me, a minute spent tasting saves you from a bland finish later on.
Why Resting Time Matters More Than You Think
After baking, allow the cups to rest for a few minutes; this isn’t just about safety. The resting period lets the cheese settle, creating a firmer bite that holds together when you lift the cup. I learned this the hard way when I tried to serve them hot off the tray and the filling oozed everywhere—turns out a short pause makes all the difference.
The Seasoning Secret Pros Won’t Tell You
A pinch of smoked paprika in the filling adds a subtle, smoky depth that mirrors the salami’s own curing process. This hidden layer of flavor is something many professional chefs keep under wraps, but once you add it, the dish feels more sophisticated. It’s the kind of detail that makes guests think you spent hours perfecting the recipe, even though it takes less than an hour.
The Crunch Factor: Baking on a Wire Rack
If you have a small wire rack that fits inside your baking sheet, place the salami cups on it instead of directly on the parchment. This allows hot air to circulate all around the cup, resulting in an even crisper shell. I tried this once for a brunch buffet, and the cups held up beautifully even after being stacked for a while.
Garnish with Purpose
A final drizzle of high‑quality extra‑virgin olive oil adds a silky finish and enhances the aromatic profile of the herbs. Sprinkle a few microgreens or a pinch of toasted pine nuts for texture contrast. The best part? These small touches elevate the visual appeal, making the dish look restaurant‑ready without extra effort.
🌈 Delicious Variations to Try
One of my favorite things about this recipe is how versatile it is. Here are some twists I've tried and loved:
Mediterranean Sunrise
Swap the parsley for fresh basil, add a teaspoon of sun‑dried tomato pesto to the filling, and top each cup with a small slice of feta. The bright, herbaceous notes combined with tangy feta create a sun‑kissed flavor that feels perfect for summer gatherings.
Spicy Southwest
Incorporate a pinch of chipotle powder into the cheese mixture and replace roasted red peppers with finely diced jalapeños. Finish with a drizzle of lime‑infused crema and a sprinkle of cilantro for a bold, zesty kick that will surprise your guests.
Cheesy Truffle Delight
Add a drizzle of truffle oil to the filling and fold in a tablespoon of finely grated Gruyère. The earthy aroma of truffle paired with the nutty Gruyère transforms the simple appetizer into an upscale, indulgent bite.
Herbaceous Garden
Mix in finely chopped chives, dill, and a touch of lemon zest into the cream cheese base. Top each cup with a small slice of cucumber and a dot of pesto for a fresh, garden‑like experience that’s perfect for spring brunches.
Sweet & Savory Fusion
Blend a teaspoon of honey into the cheese mixture and replace the roasted red peppers with finely diced dried apricots. The subtle sweetness balances the salty salami, creating a harmonious contrast that’s surprisingly addictive.
📦 Storage & Reheating Tips
Refrigerator Storage
Store any leftovers in an airtight container lined with a paper towel to absorb excess moisture. They will keep fresh for up to three days, though the salami cups may soften slightly after refrigeration. To revive the crispness, reheat them briefly in a preheated oven at 350°F for 5‑7 minutes before serving.
Freezing Instructions
These appetizers freeze exceptionally well. Place the cooled, uncooked salami cups on a baking sheet and freeze until solid, then transfer them to a zip‑top freezer bag. When ready to use, bake them directly from frozen, adding an extra 5 minutes to the cooking time; the result is just as crisp as fresh.
Reheating Methods
The trick to reheating without drying out? A splash of water or broth in the pan and a quick cover with foil for a minute, followed by a brief blast of heat to restore the crunch. Microwaving is not recommended, as it makes the salami rubbery and the filling soggy. For the best texture, use a toaster oven or a conventional oven set to 375°F for 8‑10 minutes.