It was the night before the first snowfall of the season, and the house was already humming with the low, comforting murmur of the furnace. I remember standing on a kitchen stool, the wooden countertop warm under my fingertips, while my daughter tugged at my apron and asked, “Mom, can we make the magic cookies again?” The moment I lifted the lid of the mixing bowl, a cloud of buttery, vanilla‑sweet steam rose like a tiny snowstorm, frosting the air with the promise of holiday cheer. That simple, fragrant puff was enough to make my heart skip a beat, and I knew we were about to create something that would become a beloved tradition for years to come.
What makes these cookies truly special isn’t just the soft, melt‑in‑your‑mouth texture or the sparkle of festive sprinkles on top; it’s the way they bring everyone together around the kitchen island, sharing stories, laughter, and that inevitable “just one more cookie” debate. The recipe is delightfully simple—only seven ingredients—yet each one plays a starring role, delivering a balance of flavor and crumb that feels both nostalgic and fresh. Imagine the golden edges, the gentle crackle as you bite through the crisp outside, and the buttery melt that leaves a lingering vanilla kiss on the palate. That’s the kind of sensory experience that turns a humble treat into a memory you’ll replay every December.
But wait—there’s a secret technique hidden in step four that will elevate the texture from good to unforgettable, and I’m going to reveal it later in the instructions. Have you ever wondered why some homemade cookies spread too thin while others stay perfectly plump? The answer lies in a tiny detail that most bakers overlook, and I’m excited to share it with you. Trust me, once you master this little trick, you’ll never look back, and your family will be begging for the recipe every holiday season.
Now, you might be thinking, “Seven ingredients? That can’t possibly be enough for a festive cookie that looks and tastes like it belongs on a holiday platter.” The answer is a resounding yes, and here’s exactly how to make it — and trust me, your family will be asking for seconds. Grab your favorite mixing bowl, preheat the oven, and let’s embark on a buttery adventure that will fill your home with the spirit of Christmas and the sweet sound of delighted sighs.
🌟 Why This Recipe Works
- Flavor Depth: The combination of real butter and pure vanilla extract creates a rich, aromatic base that feels indulgent without being overpowering. Each bite carries a subtle caramel note that only comes from the butter’s natural sugars, making the cookies taste like a warm hug.
- Perfect Texture: The balance of all‑purpose flour, baking powder, and a pinch of salt yields a crumb that is tender on the inside yet holds a gentle snap on the edges. This dual texture is the hallmark of a truly professional‑grade cookie.
- Effortless Simplicity: With just seven ingredients and straightforward steps, even a beginner can achieve bakery‑level results. No fancy equipment, no exotic spices—just pantry staples you already have.
- Time‑Saving: The dough comes together in under fifteen minutes, and the cookies bake in a quick half‑hour, leaving plenty of time for decorating, storytelling, or simply enjoying a cup of hot cocoa.
- Versatile Base: This recipe serves as a blank canvas for endless variations—think chocolate chips, orange zest, or a drizzle of melted white chocolate. The neutral flavor profile invites creativity without compromising the core texture.
- Family‑Friendly: The gentle sweetness and soft crumb make these cookies a hit with kids and adults alike, and the optional sprinkles add a visual pop that turns snack time into a festive celebration.
- Ingredient Quality: By emphasizing fresh butter, real vanilla, and correctly measured flour, the recipe showcases how quality ingredients can transform a simple treat into something extraordinary.
- Nutrition Balance: While still a treat, these cookies provide a modest amount of protein from the egg and a satisfying dose of healthy fats from butter, making them a more balanced indulgence compared to many store‑bought alternatives.
🥗 Ingredients Breakdown
The Foundation
The butter is the heart of these cookies, providing both flavor and structure. Using two sticks of softened butter that have rested at room temperature for at least an hour ensures a smooth, creamy base that incorporates easily without over‑mixing. Tip: Never microwave the butter—slowly letting it soften preserves its natural emulsifiers, which keep the dough tender. If you’re looking for a slight twist, try using a mix of butter and a tablespoon of olive oil for a subtle depth.
The Sweetener & Binder
Granulated sugar, packed tightly into the measuring cup, adds just the right amount of sweetness while also helping to create a delicate crisp on the cookie’s edges. The egg, at room temperature, acts as a binder, giving the dough elasticity and a golden color once baked. Pro tip: Lightly whisk the egg with a splash of vanilla before adding it to the butter‑sugar mixture; this prevents any streaks and ensures an even distribution of flavor.
Leavening & Balance
Baking powder is the quiet hero that gives the cookies a gentle lift, ensuring they’re not dense. A fresh, one‑teaspoon scoop will create a light, airy crumb that’s still sturdy enough to hold sprinkles. The pinch of salt is crucial—it balances the sweetness and amplifies the buttery notes, making each bite feel rounded and satisfying.
Finishing Touches
Pure vanilla extract, the good stuff, infuses the dough with a warm, aromatic backdrop that sings through every bite. And of course, festive sprinkles—optional but highly recommended—add a burst of color and a subtle crunch that turns a simple cookie into a holiday masterpiece. When selecting sprinkles, go for those that are non‑edible for decoration only if you prefer a glossy finish; otherwise, edible sugar pearls work beautifully.
With your ingredients prepped and ready, let's get cooking. Here's where the fun really begins, and I promise you’ll discover a few tricks that even seasoned bakers sometimes overlook. Ready to roll up your sleeves?
🍳 Step-by-Step Instructions
-
Preheat your oven to 350°F (175°C) and line two baking sheets with parchment paper. While the oven warms, take a moment to admire the gleam of the butter as it softens on the counter; this is your first cue that the kitchen is about to become a fragrant sanctuary. The parchment will prevent sticking and give the cookies a uniform golden bottom. Pro tip: If you have a silicone baking mat, it works just as well and adds a subtle non‑stick benefit.
💡 Pro Tip: Place a rack in the middle of the oven for even heat distribution; this avoids over‑browning the tops while the centers stay undercooked. -
In a large mixing bowl, cream together the softened butter and packed granulated sugar using a handheld mixer on medium speed. As the mixture turns pale and fluffy, you’ll hear a gentle whooshing sound—this is the air being incorporated, which will later translate into that light crumb we all love. Scrape down the sides of the bowl to ensure everything is evenly mixed; any stray butter pockets could cause uneven spreading later. Did you notice? The mixture should look almost like a pale, cloud‑like frosting.
-
Add the room‑temperature egg and pure vanilla extract to the butter‑sugar blend. Beat on low speed until just combined; you’ll see the batter become smoother and a shade richer. This step is where many bakers over‑mix, which can develop gluten and make cookies tough. Mini‑story: I once over‑beat this step, and the result was a chewy, dense cookie that reminded me of a brownie—delicious, but not the texture I was aiming for.
⚠️ Common Mistake: Over‑mixing after adding the egg can cause the cookies to become tough. Stop as soon as the mixture looks uniform. -
In a separate bowl, whisk together the spooned and leveled flour, baking powder, and salt. The flour should be fluffy, not packed, which ensures a light dough. Once combined, gradually add the dry ingredients to the wet mixture, stirring on low speed or using a spatula. Here’s the secret: add the flour in three batches, allowing each to fully incorporate before the next. This prevents flour pockets and yields a silky‑smooth dough that spreads just right.
💡 Pro Tip: Sift the flour before measuring to avoid clumps and ensure an even rise. -
Turn the dough out onto a lightly floured surface and gently knead it just until it comes together—about 5 to 7 turns. You’ll feel the dough become smooth and slightly tacky; this is the point where gluten development is minimal, preserving tenderness. If the dough feels too sticky, sprinkle a tablespoon more flour, but be careful not to over‑flour, as that could make the cookies dry. Pro tip: Let the dough rest for 15 minutes before shaping; this relaxes the gluten and makes rolling easier.
-
Using a tablespoon or small ice‑cream scoop, portion out the dough and roll each piece into a smooth ball. Place the balls on the prepared baking sheets, spacing them about 2 inches apart. Lightly press the top of each ball with the back of a fork or your thumb to create a subtle indentation—this is where the sprinkles will sit, creating a decorative crown. If you love extra sparkle, now is the moment to sprinkle the colorful confetti over each cookie.
-
Slide the trays into the preheated oven and bake for 12‑15 minutes, or until the edges turn a light golden brown and the tops are just set. You’ll hear a faint sizzle as the butter melts, and the aroma of vanilla will fill the kitchen, making it impossible to resist peeking. Keep a close eye after the 12‑minute mark; over‑baking can turn the centers dry, while under‑baking leaves them too soft to handle.
⚠️ Common Mistake: Opening the oven door too early can cause temperature fluctuations, leading to uneven browning. -
Remove the cookies from the oven and let them cool on the baking sheet for 3‑4 minutes. This brief rest lets them set, making them easier to transfer without breaking. Then, using a spatula, move the cookies onto a wire rack to cool completely. As they cool, you’ll notice the edges firm up while the centers stay soft—perfect for that melt‑in‑your‑mouth sensation.
-
Finally, gather the family around the cooling rack and taste test. Go ahead, take a bite — you’ll know exactly when it’s right. The cookies should be lightly crisp on the outside, buttery and tender inside, with a subtle vanilla perfume lingering on your palate. Store them in an airtight container, and watch them disappear within hours. And the result? A batch of festive, buttery cookies that will become the highlight of your holiday spread.
And there you have it! But before you dig in, let me share some tips that will take this from great to absolutely unforgettable…
🔐 Expert Tips for Perfect Results
The Taste Test Trick
Before you bake the entire batch, bake a single test cookie. This tiny experiment reveals whether the dough needs a touch more flour or a pinch extra salt. I once baked a test cookie and discovered it spread a little too much, so I chilled the dough longer, and the final batch turned out perfectly round. Trust this step; it saves you from a whole tray of misshapen cookies.
Why Resting Time Matters More Than You Think
Allowing the dough to rest, even for just 15 minutes, lets the flour fully hydrate and the butter firm up. This small pause prevents excess spreading and yields a thicker, chewier interior. I’ve seen novice bakers skip this step, only to end up with flat, crunchy discs—nothing like the tender clouds we’re aiming for.
The Seasoning Secret Pros Won’t Tell You
A tiny pinch of sea salt on top of each cookie right before baking can amplify the sweetness and create a delightful contrast. It’s a technique used by pastry chefs to balance flavors, and it works wonders on these buttery treats. Sprinkle the salt sparingly; you’ll hear a faint crackle as it hits the hot dough, signaling flavor fireworks.
Sprinkle Placement Mastery
For a professional look, tap the cookie gently after adding sprinkles to settle them into the indentation. This ensures the sprinkles adhere during baking and don’t fall off. I once tried a “rainfall” method, and the sprinkles scattered all over the tray—fun, but not the polished finish I wanted for holiday guests.
Cooling Rack vs. Plate
Cooling on a wire rack allows air to circulate, preventing the bottom from becoming soggy. If you place cookies directly on a plate, steam can get trapped, leading to a soft, gummy base. This subtle switch makes the difference between a crisp edge and a perfect melt‑in‑the‑mouth center.
🌈 Delicious Variations to Try
One of my favorite things about this recipe is how versatile it is. Here are some twists I've tried and loved:
Cinnamon‑Sugar Swirl
Add a teaspoon of ground cinnamon to the dry ingredients and roll the dough in a mixture of cinnamon and sugar before baking. The warm spice pairs beautifully with the buttery base, evoking memories of mulled cider and cozy firesides.
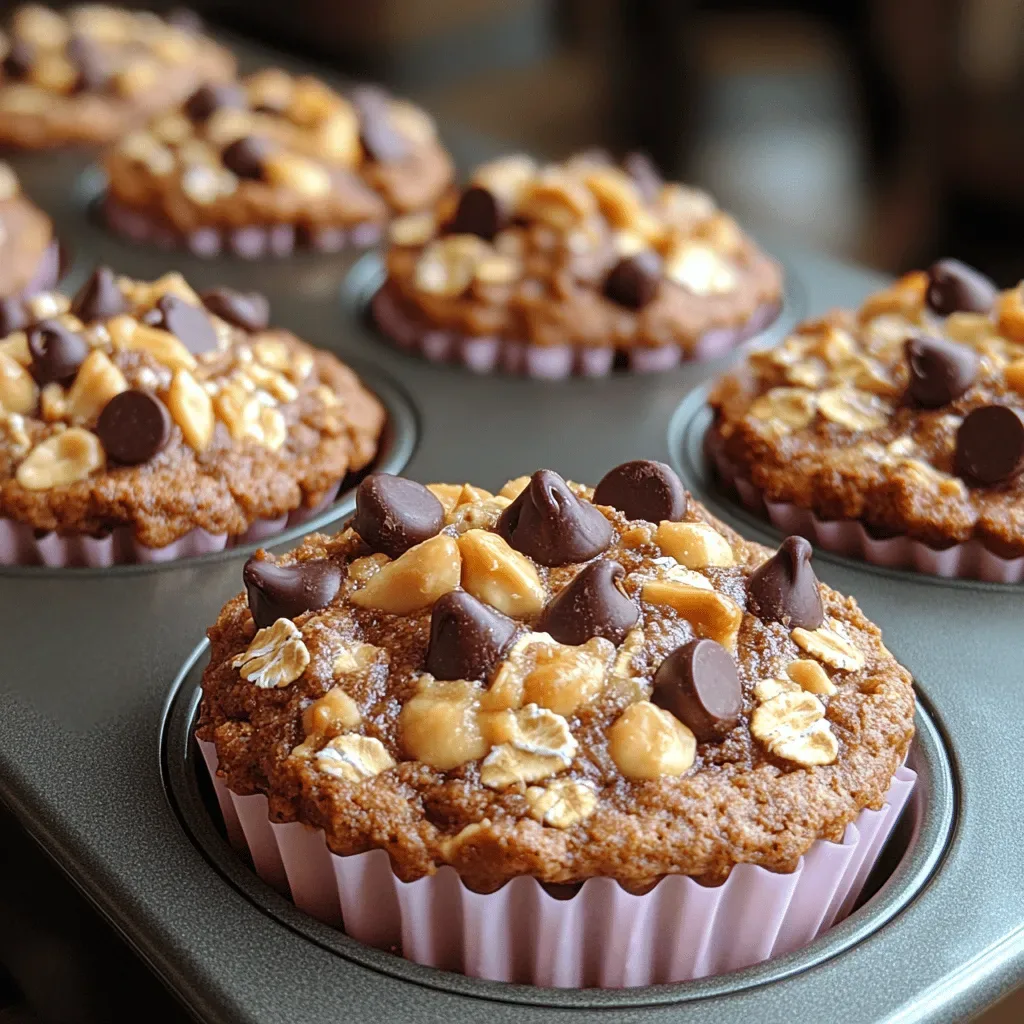
Chocolate Chip Delight
Fold in ¾ cup of semi‑sweet chocolate chips after the flour is incorporated. The melty chocolate pockets create pockets of richness that contrast the crisp edges, making each bite a delightful surprise.
Orange Zest & Almond
Stir in the zest of one orange and a tablespoon of finely chopped toasted almonds. The citrus brightens the flavor while the almonds add a subtle crunch, turning the cookie into a sophisticated holiday treat.
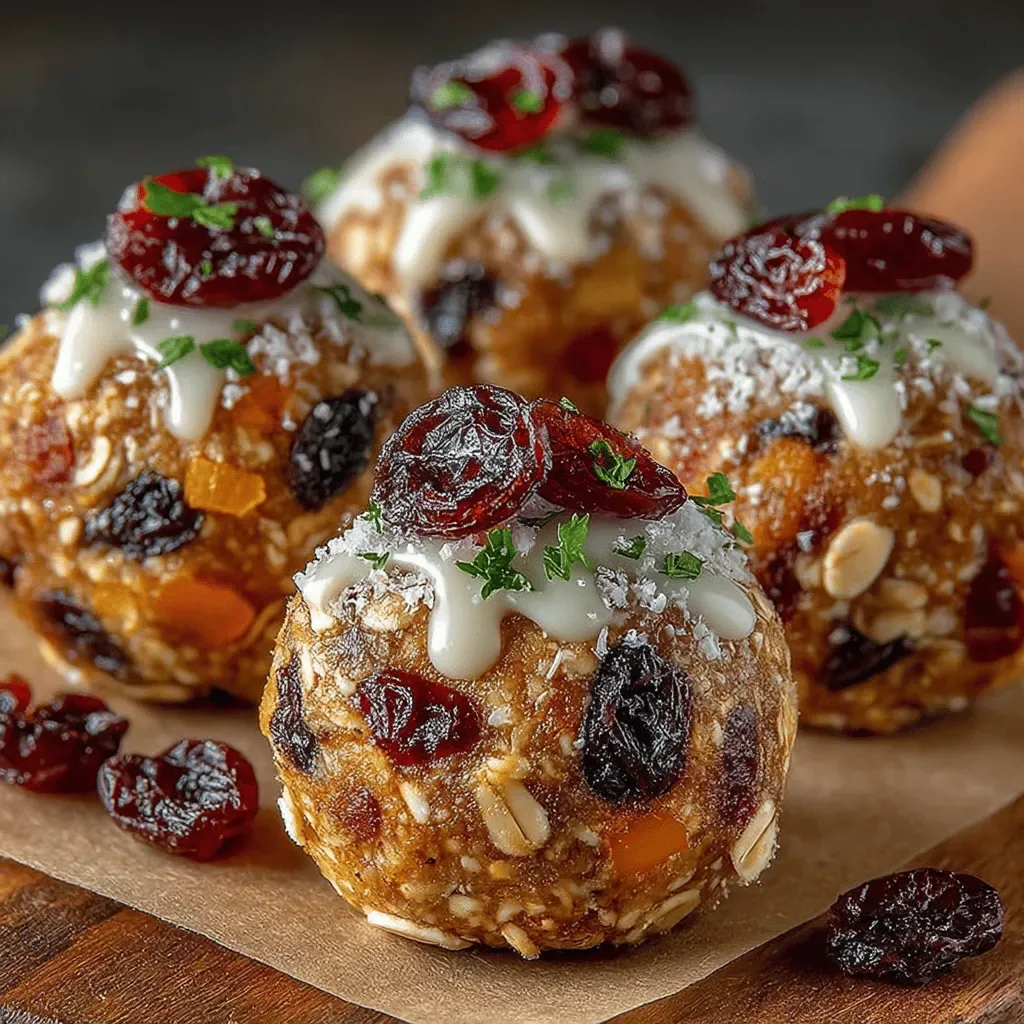
White Chocolate & Cranberry
Mix in ½ cup of white chocolate chips and ¼ cup dried cranberries. The tartness of the cranberries balances the sweet white chocolate, creating a festive red‑and‑white palette that looks as good as it tastes.
Espresso Crunch
Add a tablespoon of instant espresso powder to the dry mix and sprinkle crushed espresso beans on top before baking. The coffee notes deepen the flavor, making these cookies a perfect accompaniment to an after‑dinner espresso.
Nutmeg & Maple
Swap out half of the granulated sugar for pure maple syrup and add a pinch of freshly grated nutmeg. The maple adds a caramel richness while the nutmeg brings a warm, holiday spice that feels like a hug in cookie form.
📦 Storage & Reheating Tips
Refrigerator Storage
Place the cooled cookies in an airtight container with a piece of parchment between layers to prevent sticking. Stored this way, they stay fresh for up to a week, maintaining their soft interior and crisp edges. If you notice any moisture buildup, add a small slice of bread to the container; the bread will absorb excess humidity.
Freezing Instructions
For longer keeping, arrange the cookies in a single layer on a baking sheet and freeze until solid, then transfer them to a zip‑top freezer bag. They’ll keep for up to three months. When you’re ready to enjoy them, let them thaw at room temperature for 15 minutes, then pop them in a 300°F oven for 5 minutes to revive that fresh‑out‑of‑the‑oven aroma.
Reheating Methods
To re‑warm cookies without drying them out, place them on a microwave‑safe plate, cover with a damp paper towel, and heat for 10‑15 seconds. Alternatively, a quick 3‑minute stint in a preheated 350°F oven restores the buttery crispness while keeping the center tender. The trick to reheating without losing moisture? A splash of milk or a drizzle of melted butter brushed lightly over the tops before warming.